My apartment kitchen has roughly 14 inches of usable counter space between the sink and the refrigerator. No gas. One electrical outlet on that side of the counter. When I moved in, I figured I would mostly eat sandwiches and order Thai food every third night. Then a friend left a Duxtop 1800W portable induction cooktop at my place after a dinner party, and I started cooking everything on it. That was eleven months ago. I have not ordered Thai food more than twice since.
The problem most people run into with a single-burner setup is not the burner. It is the planning. They try to cook the way a four-burner range demands, keeping three things warm while a fourth finishes, and the whole system collapses. Once you understand that a single-burner kitchen is a sequencing problem, not a hardware problem, everything changes. This guide gives you the exact method I use.
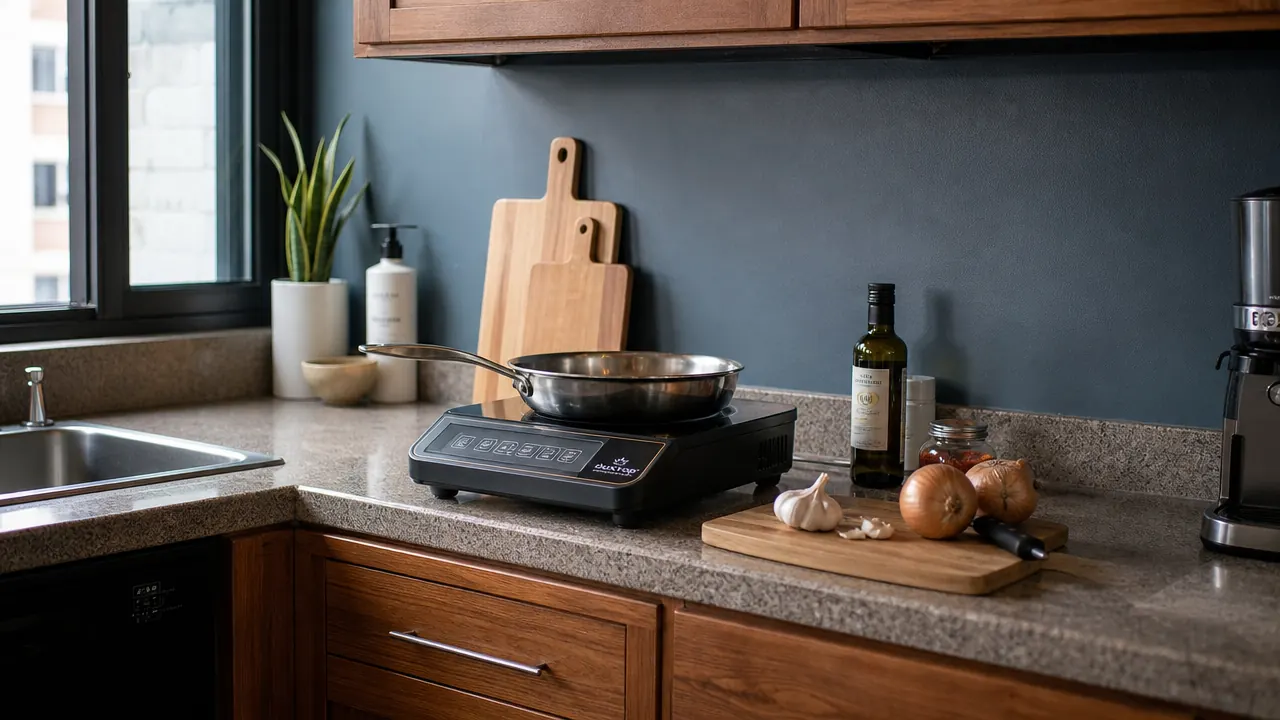
No gas, no room for four burners? The Duxtop 1800W handles a full dinner on a single outlet.
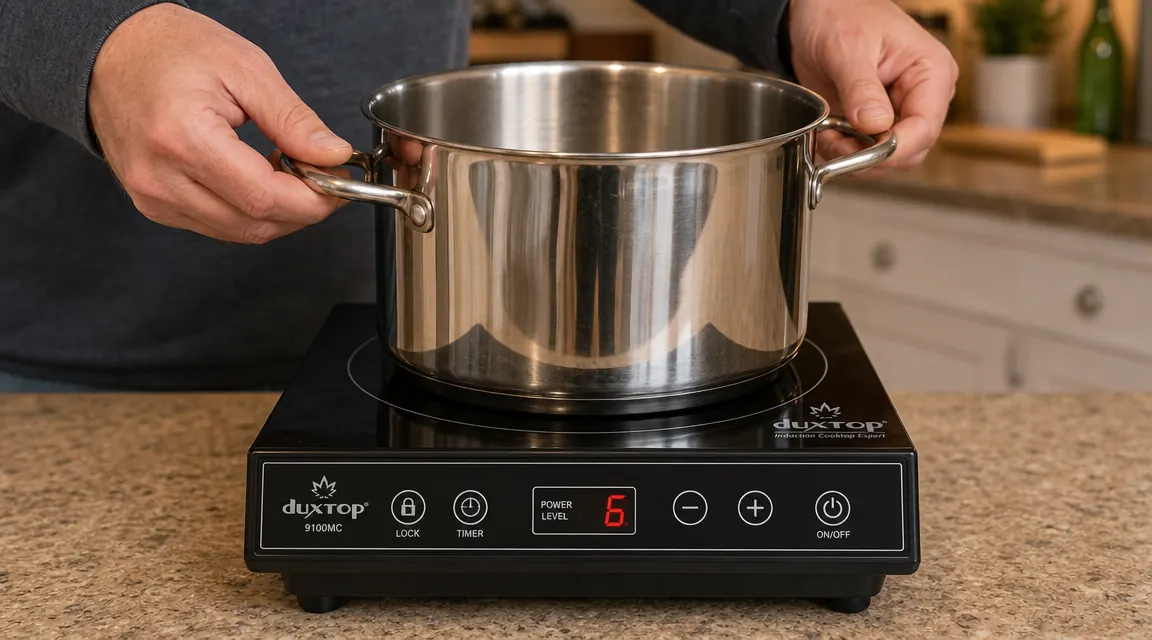
The 9100MC model has 10 power levels, a sensor touch panel, and a 13.4-inch footprint that fits between a toaster and the wall. It is the cooktop I cook on every night.
Amazon Check Today's Price on Amazon →Step 1: Audit Your Cookware for Induction Compatibility Before You Cook Anything
Induction only works with ferromagnetic cookware. Stick a refrigerator magnet to the bottom of your pan. If it holds, the pan works. If it slides off, it does not. Most stainless steel cookware passes. All cast iron passes. Most hard-anodized aluminum, glass, and copper fails unless the manufacturer added an induction disk to the base.
For a single-burner setup, you need three pieces that cover everything: a 10-inch or 12-inch stainless steel skillet for searing, sauteing, and shallow sauces; a 3-quart saucepan for grains, soups, and blanching; and a wide 4-quart saute pan or Dutch oven for braises, stews, and one-pot pastas. Those three vessels let you cook 90 percent of weeknight dinners without reaching for anything else. Before you follow the steps below, confirm every pan you plan to use passes the magnet test.
One practical note about the Duxtop 9100MC surface: the cooktop ring is 7.5 inches in diameter. Pans under 5 inches across will not engage the sensor correctly. Oversized pans, anything above 10 inches on the base, work fine, they just heat unevenly at the outer edge. Stay in the 8-to-10-inch base range for best results.
Step 2: Plan Your Meal Backward, Starting with What Holds Heat
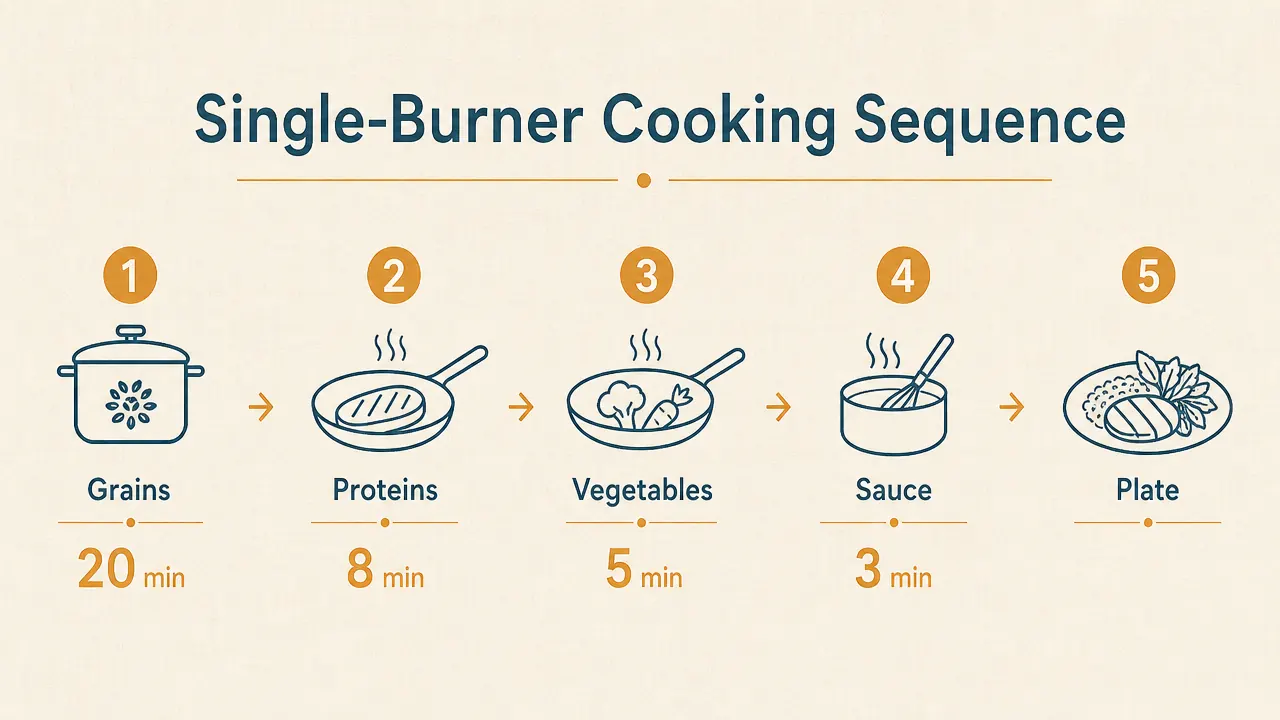
This is the most important mental shift. On a four-burner stove you can keep four things at temperature simultaneously. On one burner, you sequence. You decide what finishes last and build everything else around it. The rule is: cook your slowest component first, and choose components that hold temperature well once they are off the heat.
Grains and legumes hold heat beautifully. Rice, quinoa, farro, and lentils can all be cooked first, covered tightly, and left on the counter for 15 to 20 minutes while everything else cooks. They arrive at the table warm without a second of active heat. Braised proteins (chicken thighs, ground turkey, beef in a sauce) also hold well, better than dry-seared fish or a plain chicken breast, which go leathery if they sit. Vegetables are your last item. They take three to six minutes on high heat and should go directly to the plate.
A working sequence for a full dinner looks like this: grains cook and rest, proteins go in the same pan (or a rinsed saucepan) with aromatics, vegetables go in last on high heat, sauce reheats in 90 seconds. By the time the vegetables are done, everything else is ready. You plate in reverse order of finish time.
Step 3: Use the Duxtop Power Levels as a Dial, Not Just High or Low
Most people use a portable cooktop the same way they use a cheap hot plate: full power or nothing. The Duxtop 9100MC has 10 power levels for a reason. Level 10 is 1800 watts, which boils a full pot of water faster than a standard gas range. Level 1 is a gentle simmer that keeps a bechamel sauce from scorching. The middle levels, 4 through 7, are where most actual cooking happens.
For searing proteins, start at level 8 or 9, preheat the pan for 90 seconds, then add oil and immediately add the protein. Induction heats the pan directly, so the pan is ready faster than you expect. For sauteing aromatics (onion, garlic, ginger), level 5 or 6 gives you a steady medium heat with good control. For simmering anything in liquid, levels 3 or 4 keep things moving without a rolling boil that reduces liquid too fast. For keeping a finished dish warm while you cook the next component, level 1 or 2 is enough, though a lid holds heat better than the burner at that level.
Induction does not forgive a distracted cook the way a gas flame does. The pan gets hot fast and stays hot. That speed is the feature, not the problem, once you learn to work with it.
Step 4: Build a Core Set of Five Single-Burner-Friendly Recipes
Random improvisation is the enemy of single-burner cooking. You want a rotation of five to seven recipes you know cold, where the sequencing is second nature and the shopping list is predictable. Here are five that work exceptionally well on one burner.
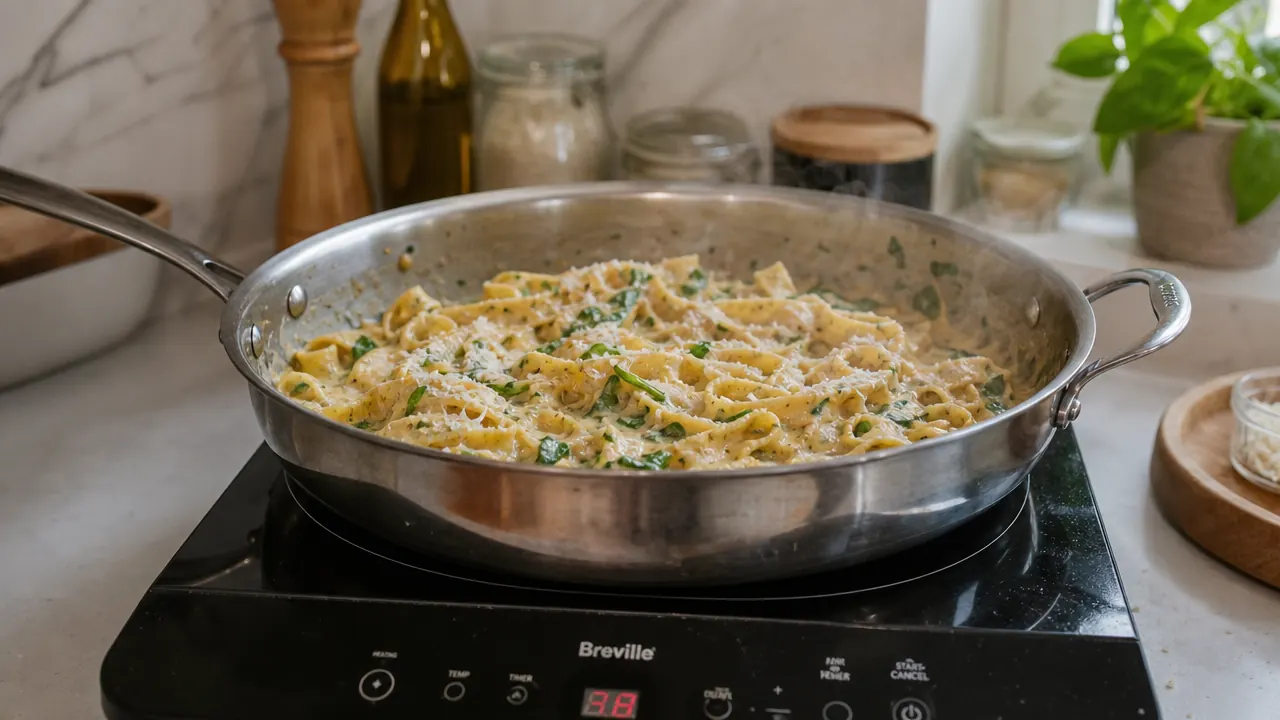
One-pot pasta is the most forgiving. Add uncooked pasta, crushed tomatoes or broth, aromatics, and a handful of greens to the saute pan, bring to a boil on level 9, stir regularly, drop to level 5 once everything is bubbling, and cook uncovered until the pasta absorbs the liquid and the sauce thickens. You dirty one pan. Nothing sequences. Start to finish in 22 minutes. Rice bowls with a seared protein work well because the rice cooks and holds while you sear the protein in a skillet. Stir-fry over high heat takes under eight minutes and uses a single wok or skillet. Lentil soup cooks in 35 minutes in the saucepan with minimal attention. Sheet pan-style roasted vegetables adapted to the skillet, tossed in oil with salt and covered for five minutes on level 8, caramelize well and hold at room temperature.
Once you have five recipes you execute without thinking, you can begin adding complexity: a quick sauce made in the just-emptied skillet while the protein rests, a second vegetable component cooked in overlapping time with the grain. The system builds on itself.
Step 5: Keep the Cooktop Clean and the Counter Organized Between Cooks
The Duxtop 9100MC has a smooth glass-ceramic surface that wipes clean in about 30 seconds after cooking. Do not use abrasive scrubbers or steel wool. A damp microfiber cloth handles most spills when they are still warm. If something bakes on, a few drops of white vinegar on a soft cloth removes it without scratching.
In a small kitchen, the cooktop earns its counter space by doing double duty between uses. When it is off, it becomes a staging surface for plating or a place to set a cutting board. The flat glass top supports weight and stays cool outside the cooking zone during use, which makes it much safer to brush against than an open gas burner. This matters in a 90-square-foot kitchen where you and another person are both moving.
Store the cooktop flat, not tilted against a wall. The glass surface can crack under lateral pressure if something falls against it. If you have a deep cabinet, keep a fitted silicone mat under it to prevent sliding. The power cord is about 5.9 feet, which is long enough to reach most apartment outlets without an extension cord, but measure your outlet placement before you commit to a counter position.
What Else Helps When You Are Cooking on One Burner
A digital instant-read thermometer removes the guesswork from proteins cooked in a sequence where resting time adds up. If your chicken thigh hit 165 degrees before you rinsed the pan for vegetables, it does not matter that 12 minutes have passed. You know it is still safe and the internal temp will have dropped to a pleasant eating temperature. A good probe thermometer is a $20 tool that reduces anxiety significantly in a sequenced cook.
A tight-fitting lid for your largest pan is not optional. It is the mechanism that lets food hold heat between burner cycles. A wide stainless lid that fits your 4-quart saute pan will serve double duty covering the saucepan in most cases. Keep it clean and on the counter during cooking so you can grab it without hunting.
Mise en place is more important on one burner than on four. When you have four burners, you can stall one component while you chop the next item. On one burner, if something is cooking and you are still chopping, you either burn what is in the pan or you scramble. Do all your chopping, measuring, and prep before you turn the cooktop on. This sounds obvious, but it transforms the experience from stressful to methodical.
If you want a deeper look at how the Duxtop 1800W holds up over time, including how it handles daily use and what breaks down first, the long-term review covers 12 months of real apartment cooking. For a more direct assessment of whether this model is the right buy for your specific setup, the honest review goes through the tradeoffs without the marketing framing.
The Duxtop 1800W is the burner this whole guide is built around. If you are cooking real food in a no-gas kitchen, this is where to start.
4.4 stars from over 9,000 buyers. Ten power levels. Sensor touch controls. It fits in 14 inches of counter space and runs on a standard 120V outlet. Check current availability before the price changes.
Amazon Check Today's Price on Amazon →